Contents:
- Quick Answer Box
- Understanding Clipper Guards and Hair Length
- Choosing Your First Clipper Set
- Setting Up Your Workspace
- How to Cut Men’s Hair with Clippers: Step-by-Step Process
- Step 1: Consultation and Planning
- Step 2: Wash and Prepare Hair
- Step 3: Start with the Sides
- Step 4: Blend the Fade (If Desired)
- Step 5: Cut the Back
- Step 6: Work on the Top
- Step 7: Detail Work Around Hairline and Ears
- Step 8: Final Inspection and Touch-Ups
- Common Mistakes and How to Avoid Them
- Hair Types and Adjustments
- Expert Tip: The Barrel Roll Technique
- Aftercare and Styling Tips
- From Anxiety to Confidence: Your Learning Curve
- FAQ
- How much can you save by cutting hair at home?
- What guard number should I use for a standard men’s cut?
- Can you cut curly or textured hair with clippers?
- How often do clipper blades need sharpening?
- Is it possible to create a professional-looking fade at home?
- Your Next Haircut Awaits
You can save £1,500-2,000 annually by cutting men’s hair at home instead of visiting a barber six times yearly. That’s not just a nice-to-have—it’s genuinely life-changing money, particularly for families with multiple men or fathers wanting to maintain their sons’ haircuts affordably.
Learning how to cut men’s hair with clippers looks intimidating until you understand the basic mechanics. You’re not sculpting—you’re using numbered guards that remove precisely the same length of hair every time. This repeatable consistency makes clipper cuts actually easier for beginners than hand-scissors work.
Quick Answer Box
The essentials: You need clippers with adjustable guards (£25-80), a comb, scissors for detailing, and 15-30 minutes. Start with guard number 2 or 3 on the sides and back, longer on top, then blend. Keep clippers moving upward against hair growth. Practice on a willing friend first. Most people create acceptable cuts within three attempts.
Understanding Clipper Guards and Hair Length
Clipper guards are numbered, and each number corresponds to a specific hair length. This standardisation is what makes clipper work so forgiving—you control exactly how much hair is removed through guard selection alone.
- Guard 0 (no guard): Removes all hair down to skin. Creates completely bare patches. Rarely used for full haircuts.
- Guard 0.5: Leaves 0.4-0.6mm hair. Creates nearly-bald fades. Used for ultra-short styles or aggressive edges.
- Guard 1: Leaves 1.2mm hair. Short, neat, visible stubble. Common for military cuts and low fades.
- Guard 1.5: Leaves 1.8mm hair. Still very short but with texture. Popular for modern, sharp fades.
- Guard 2: Leaves 2.4mm hair. Short but textured enough to see natural hair colour clearly. Most common choice for sides and back.
- Guard 3: Leaves 3.6mm hair. Medium-short. Popular for blending with top hair or for people who prefer length.
- Guard 4: Leaves 4.8mm hair. Noticeably longer. Used for very gradual blends or on top for medium cuts.
- Guard 5+: Leaves 6mm or more hair. Used only for extended top length in longer hairstyles.
A standard men’s cut uses three different guards. Lower guards (0.5-2) on the sides and back create a fade or shorter frame. Middle guards (2-4) blend the sides to the top. Longest guards (4+) preserve length on top for styling.
Choosing Your First Clipper Set
Budget options (£20-40) work fine for occasional use. The Remington HC5855 costs around £35 and handles home cutting capably. However, if you’re planning monthly cuts, a mid-range option (£50-100) lasts longer and offers better control. The Wahl Cordless Senior (£79) is specifically designed for home and salon use, with comfortable grip and reliable motor.
Professional-grade clippers (£150-400) are overkill for home use unless you’re planning to cut hair for 10+ people regularly. They heat up less and last longer, but the price isn’t justified for occasional personal use.
Key features to prioritise:
- Adjustable guards: Non-adjustable clippers are worthless for modern cuts. You need at least 4-5 different guards.
- Cordless or corded options: Cordless is more convenient, but corded clippers have more consistent power. Hybrid options (cordless with cord backup) cost £60-100.
- Comfortable grip: You’ll be holding clippers for 20+ minutes. Poor grip causes hand cramping and shaky lines.
- Quiet motor: Clippers above 5000 RPM run quieter and cut more efficiently. Budget models often sound like angry bees.
David Martinez, a certified trichologist at the London Hair Institute, notes: “Clipper quality matters for professional use but is negligible for home cutting. Any clipper with clean blades and functional guards will produce acceptable results. The operator’s technique matters 10 times more than the equipment cost.”
Setting Up Your Workspace
You’ll need a clean, well-lit area. Bathroom lighting often works, though a clip light or ring light dramatically improves visibility—you can spot uneven patches and stray hairs that might otherwise be missed.
Use a chair with a comfortable backrest. The person getting the haircut should sit upright and still. A wobbly kitchen chair encourages fidgeting, which leads to uneven cuts. A sturdy dining chair or hairdressing chair is ideal.
Place a towel or cape around the person’s shoulders. It catches hair clippings and protects clothing. You can use an actual hair-cutting cape (£8-15) or simply drape a large dark towel. Dark fabric hides loose hairs; light fabric makes them visible but stains easily.
Keep your tools within arm’s reach: clippers, all numbered guards, a fine-toothed comb, scissors, a spray bottle of water, and a handheld mirror. Having everything accessible prevents interruptions mid-cut.
How to Cut Men’s Hair with Clippers: Step-by-Step Process
Step 1: Consultation and Planning
Ask the person getting the cut exactly what style they want. Show pictures or reference styles. Discuss fade preferences (high fade, mid fade, low fade—describing where the blend starts). Talk about top length. More importantly, understand whether they prefer sharp lines or soft, blended transitions.
Run your fingers through their hair to assess texture and natural growth patterns. Hair direction and cow-licks affect how fades look. A section that grows naturally upward may need a slightly longer guard to prevent visible scalp shine.
Step 2: Wash and Prepare Hair
Wash hair with warm water and a mild shampoo. Damp hair is easier to cut than completely dry hair because you can see the natural length clearly and hair sits flatter. Dry it with a towel until damp but not dripping—no excess water running down the neck.
Comb through thoroughly. This removes tangles and aligns hair in its natural growth direction. Combing also lifts hair slightly, making clipper work more efficient.
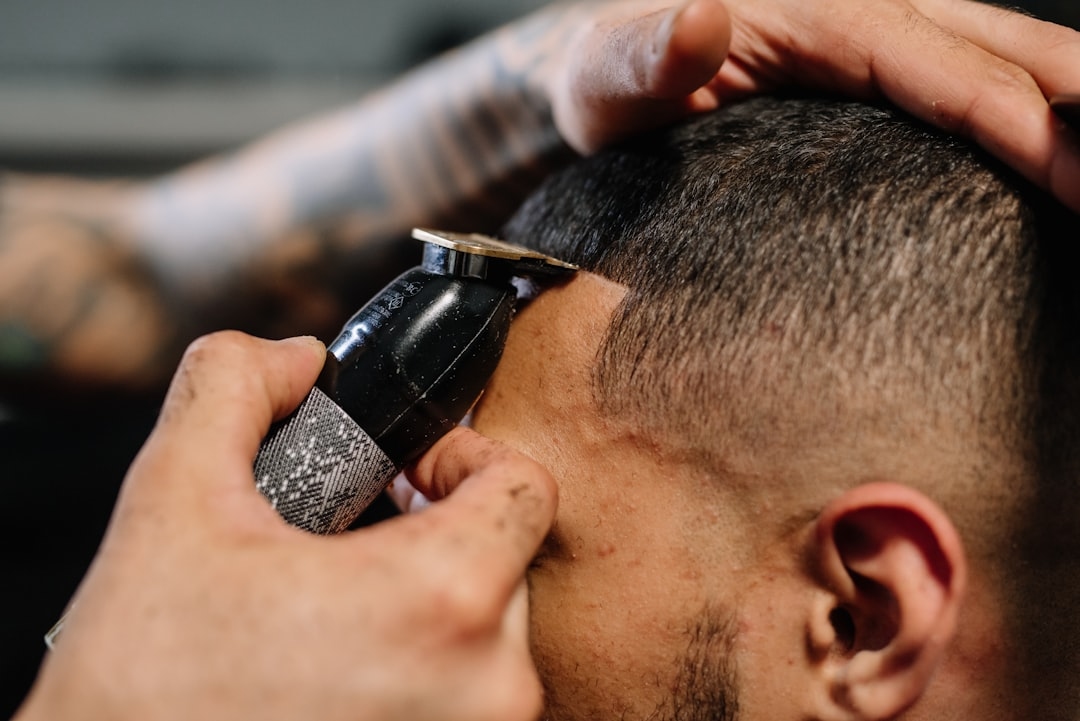
Step 3: Start with the Sides
Begin on the right side of the head, below the ear. Select your chosen guard (typically 2 or 3 for a standard cut). Insert the guard onto the clipper head firmly—it must be fully seated or it’ll slip during cutting.
Hold the clippers at a 90-degree angle to the scalp initially. Place them at the bottom of the sideburn area. Push upward, against the direction of hair growth. This lifts hair and ensures the guard catches every strand.
Move slowly—about one vertical motion per second. Fast movements create uneven patches because clippers aren’t cutting all the hair at the same height. Slow, deliberate movements ensure consistency.
Work your way around the right side, moving from bottom to top. Cover the area from the ear up to the temple, roughly at the level where hair parts naturally. You’re creating the “side” section.
Step 4: Blend the Fade (If Desired)
A fade gradually transitions from shorter hair at the bottom to longer hair at the top. This looks modern and polished. Non-fade cuts have an abrupt line where the short sides meet the longer top.
To create a fade, use a slightly longer guard for a second pass on the sides. If you used guard 2, now use guard 3. Start higher on the head this time—roughly mid-ear level. Work upward, creating an overlapping zone where guard 2 and guard 3 intersect.
This overlap zone should be 2-3 centimetres wide. Within this zone, hair gradually transitions from 2.4mm to 3.6mm, creating the visual fade. Repeat on the left side for consistency.
Step 5: Cut the Back
Work on the back of the head using the same technique as the sides. Start at the nape (lowest point) and work upward. Move the clippers in vertical motions, always pushing upward against hair growth.
The back often has different hair growth directions than the sides. Some people have hair that grows downward at the nape and outward on the sides. Work with these patterns rather than against them.
Step 6: Work on the Top
The top requires different technique than the sides. You’re not pushing clippers upward against growth—you’re combing hair upward and then cutting straight across. This preserves the length you want on top.
Comb the top hair upward. Hold clippers horizontally and carefully cut across the top, removing only the excess length that extends beyond your target guard. Take very thin passes. It’s easier to cut more later than to add length back.
Many people prefer scissors on the top rather than clippers, as scissors give finer control. If you’re using clippers, use a longer guard (4 or 5) and check your work frequently with a comb.
Step 7: Detail Work Around Hairline and Ears
Use a smaller guard (0.5 or 1) to clean up the edges around the ears, sideburns, and neckline. Hold clippers at a slight angle and make quick, light passes. These areas are sensitive and visible, so precision matters.
For the neckline, use upward motions starting at the neck’s base and moving up toward the back of the head. Create a straight or slightly curved line across the nape, depending on preference.
For around the ears, hold the ear flat against the head to protect it. Work carefully with guard 1 or smaller, creating a clean line that follows the ear’s natural shape.
Step 8: Final Inspection and Touch-Ups
Dry the hair completely and examine from all angles. Look for uneven patches, stray long hairs, or obvious mistakes. Use a handheld mirror so the person getting the cut can see the back and sides.
Make minor adjustments. Any patches that look noticeably longer can be refined with an additional careful pass of appropriate guards. Don’t overcorrect—one extra pass might be enough.
Common Mistakes and How to Avoid Them
Cutting too aggressively on the first pass. Clippers remove hair permanently. If you’re unsure about length, use a longer guard first. You can always remove more hair. You cannot add hair back. Start conservative.
Holding clippers at the wrong angle. Clippers at 45 degrees or flat against the scalp cut unevenly. Maintain close to 90 degrees (perpendicular to scalp) to ensure the guard is doing its job consistently. This is the single most important technique point.
Skipping the blend. A sharp line between the guard 2 sides and guard 4 top looks amateur. Blending with an intermediate guard (3) takes 30 seconds extra and dramatically improves results.
Moving too quickly. You’ll rush on your second and third cuts, thinking you’ve learned the technique. Speed comes with confidence, but even experienced cutters move deliberately. Slow down.
Not combing between passes. Hair that’s been cut can sit oddly, making it hard to see what needs refinement. Comb through the section you just cut. This reveals stray long hairs and uneven patches you’d otherwise miss.
Forgetting to clean clipper blades. Hair accumulates between the guard and blade, reducing cutting efficiency and creating pulling sensations. Every 3-5 minutes, remove the guard and brush loose hair from the blade area. This takes 10 seconds and dramatically improves cut quality.
Hair Types and Adjustments
Thick, coarse hair: Requires slightly more aggressive guard choices and slower, more deliberate movements. Coarse hair resists clipper cutting, so the blade needs time to work. Use guards one size shorter than you would for fine hair.
Fine, thin hair: Very responsive to clippers. Use guards one size longer to avoid showing scalp. Fine hair benefits from fades because the gradual transition hides any thin patches.
Curly hair: When dry, curly hair stands away from the scalp, making guard selections difficult to judge. Always wash curly hair before cutting and cut while damp. Dry curly hair appears 5-10mm longer than it actually is.
Receding hairline: Slightly longer guards on the crown (4-5) versus sides (2-3) creates a visual balance that downplays receding. Avoid very short cuts that emphasise thinning.
Expert Tip: The Barrel Roll Technique
Professional barbers use a technique called the “barrel roll” on the sides and back. Instead of straight vertical motions, they rotate clippers in a slight circular motion while pushing upward. This creates a more blended, flowing cut with less visible lines.
To practise this: push clippers upward while simultaneously rotating the clipper head slightly clockwise (on the right side) or counterclockwise (on the left side). The motion is subtle—maybe 15-20 degrees of rotation over the entire upward motion. This takes practice but produces noticeably smoother results once mastered.
Aftercare and Styling Tips
After a fresh cut, hair sits and looks its best. By day 2-3, depending on hair type, it starts looking scruffy or less defined. Here’s how to maintain the cut between trims:
Use a light pomade or styling cream. Products like Baxter of California Clay Pomade (£16) add definition and help direct hair in the cut’s intended direction. Apply sparingly—excessive product looks greasy.
Comb in the direction the cut is designed to go. Most men’s cuts have a natural direction. Combing against it fights the grain and looks messy. After 2-3 days of wearing the cut correctly, hair sets into the desired direction.
Trim every 4-6 weeks. Men’s hair grows roughly 12-15mm monthly. A fresh clipper cut lasts beautifully for 3 weeks. By 4-5 weeks, it’s starting to look unkempt. A quick 15-minute trim maintains the look without a full restyle.
From Anxiety to Confidence: Your Learning Curve
Your first cut will be imperfect. Expect uneven areas, slightly mismatched sides, and a general “I did this myself” appearance. This is completely normal and not a failure. You’ve created a functional haircut from scratch—that’s genuinely impressive.
By your third or fourth cut, you’ll notice dramatic improvement. Your hand will be steadier. You’ll understand your clippers’ quirks. You’ll anticipate problems and prevent them proactively.
By your tenth cut, you’ll be producing results that rival basic barber work. By your twentieth, you’ll have a signature style that looks intentional and professional.
Keep practicing. Recruit willing friends and family. Watch YouTube videos of professional barbers and practise their techniques. Every cut teaches something—even mistakes teach you what not to do next time.
FAQ
How much can you save by cutting hair at home?
A men’s haircut costs £15-40 at UK barber shops, averaging £25. Six cuts yearly costs £150. Learning to cut at home costs a one-time £40-80 for clippers and saves £150+ annually per person. For a family of four men, you save £600+ yearly, paying for clippers within two months.
What guard number should I use for a standard men’s cut?
Guards 2 or 3 for sides and back, guard 4 or 5 on top, with a guard 1 for detailing and edges. This creates a traditional fade that works for most men. Adjust based on personal preference and hair type.
Can you cut curly or textured hair with clippers?
Yes, but with modifications. Always wash and cut curly hair while damp or wet. Dry curly hair appears 5-10mm longer than it actually is, leading to cuts that are accidentally too short. Damp hair shows true length.
How often do clipper blades need sharpening?
With home use (roughly monthly cuts for one person), clipper blades last 2-3 years before needing professional sharpening. They’ll begin to pull or snag rather than cut cleanly. Professional sharpening costs £15-25 and restores like-new performance.
Is it possible to create a professional-looking fade at home?
Absolutely. Fades require using 2-3 different guards with blended transitions. It takes practice, but by your fourth or fifth cut, you’ll create fades that look intentional and professional. The key is using intermediate guards and overlapping zones rather than abrupt lines.
Your Next Haircut Awaits
Every barber in the UK started exactly where you are now—anxious, uncertain, wondering if they’d destroy someone’s hair. They didn’t. Neither will you. The techniques in this guide work. Your first attempt might be rough, but it will be functional. Your tenth attempt will impress people. Your twentieth will earn genuine compliments.
The money you save is real. More importantly, the confidence you’ll build is transformative. You’re learning a skill that serves you for life and saves thousands over decades. Start this weekend. Find a willing friend. Grab clippers and guards. You’ve got this.